home-made trobentice- velocity stacks
37 prispevkov
• Stran 2 od 2 • 1, 2
Re: home-made trobentice- velocity stacks
![]() Napisal/-a eugene dne Po Maj 17, 2010 12:16 am
Napisal/-a eugene dne Po Maj 17, 2010 12:16 am
zakaj prvo z wdjem in nato z barvo? drugače pa mi zvuči dobro. moram nardit zdaj en pozitiv iz tistega prototipa. pole dalje. tudi tisto z komplet silikonom mi zvuči dobro samo gips je praktično đabe.
"Try not. Do. Or do not. There is no try." - Master Yoda
-

eugene - Valček s.p.
- Prispevkov: 3819
- Pridružen: To Avg 08, 2006 2:21 pm
- Kraj: Vukojebina
- Avto: Mk1 gti, hrošč '67, volvo 145 in 245 superpolar
Re: home-made trobentice- velocity stacks
![]() Napisal/-a fritz dne Po Maj 17, 2010 2:04 am
Napisal/-a fritz dne Po Maj 17, 2010 2:04 am
vzet moras gips tipo borotalko, ne unega mesanega s peskom. pure white dust 
ce pospricas prvo z vd in potem z barvo, je lazje odstranit ostanke gipsa z izdelka in lazje
prit do barve, ki jo obrises z nitrotom....
ce pospricas prvo z vd in potem z barvo, je lazje odstranit ostanke gipsa z izdelka in lazje
prit do barve, ki jo obrises z nitrotom....
-

fritz - Wheel whore
- Prispevkov: 13403
- Pridružen: Sr Jan 25, 2006 10:52 pm
- Kraj: tanajtabujsiklima
- Avto: Golf Rallye G60
Re: home-made trobentice- velocity stacks
![]() Napisal/-a eugene dne Če Maj 20, 2010 12:17 pm
Napisal/-a eugene dne Če Maj 20, 2010 12:17 pm
kaj za fiberglas rabim primer za plastiko al lahko uporabim običen mobihel primer?
"Try not. Do. Or do not. There is no try." - Master Yoda
-
eugene - Valček s.p.
- Prispevkov: 3819
- Pridružen: To Avg 08, 2006 2:21 pm
- Kraj: Vukojebina
- Avto: Mk1 gti, hrošč '67, volvo 145 in 245 superpolar
Re: home-made trobentice- velocity stacks
![]() Napisal/-a DS71 dne Če Maj 20, 2010 1:01 pm
Napisal/-a DS71 dne Če Maj 20, 2010 1:01 pm
Za fiberglass ponavadi ne rabiš nobenih primerjev..jaz ponavadi samo prežlifam,špric kit in še 1x žlifam..pa verjetno da tudi špric kita ne bi rabil če je odlitek odličen
..THERE WILL NEVER BE ANYTHING LIKE THEM AGAIN...the NOISE...the SPEED...the POWER...the GROUP B...
-

DS71 - Stalni uporabnik
- Prispevkov: 1966
- Pridružen: Če Feb 05, 2009 9:51 pm
- Kraj: Il. Bistrica
- Avto: zoom zoom
Re: home-made trobentice- velocity stacks
![]() Napisal/-a Tine dne Pe Maj 21, 2010 12:47 pm
Napisal/-a Tine dne Pe Maj 21, 2010 12:47 pm
Kako pa kaj poliester prenaša bencin? Za končni izdelek mislim, ne da bi kje lahko pomagal pri postopku izdelave.
Glavno je, da je še vedno vse pod kontrolo.
-

Tine - Kmetavzar
- Prispevkov: 1626
- Pridružen: To Nov 04, 2008 1:30 pm
- Kraj: Maribor
- Avto: Renault Clio 1.5 dCi
Re: home-made trobentice- velocity stacks
![]() Napisal/-a DS71 dne Pe Maj 21, 2010 1:53 pm
Napisal/-a DS71 dne Pe Maj 21, 2010 1:53 pm
kakor imam jaz izkušnje dobro..vem za par primerov predelanih motociklov kateri imajo fiberglass rezervarje za bencin
..THERE WILL NEVER BE ANYTHING LIKE THEM AGAIN...the NOISE...the SPEED...the POWER...the GROUP B...
-
DS71 - Stalni uporabnik
- Prispevkov: 1966
- Pridružen: Če Feb 05, 2009 9:51 pm
- Kraj: Il. Bistrica
- Avto: zoom zoom
Re: home-made trobentice- velocity stacks
![]() Napisal/-a BureK dne So Maj 22, 2010 11:16 am
Napisal/-a BureK dne So Maj 22, 2010 11:16 am
EPOXY forever !
-
BureK - Z jogurtom
- Prispevkov: 10874
- Pridružen: Sr Jan 25, 2006 12:34 pm
- Kraj: predor Markovec
- Avto: Rallye Golf
Re: home-made trobentice- velocity stacks
![]() Napisal/-a frcac dne Ne Maj 23, 2010 11:36 am
Napisal/-a frcac dne Ne Maj 23, 2010 11:36 am
Za majhne izdelke nepravilnih oblik se KRASNO obnese lateks / silikon kalup. S pravilnim ulivanjem tekočega lateksa dobiš dobro površino (brez mehurčkov), odstranljiva forma (okvir) pa poskrbi za dobro ponovljivo obliko. Dobi se ga v trgovinah "za umetnike" in ni drag.
Obvezno branje - http://wiki.rg.htmldesign.de/index.php? ... loadcenter - oziroma konkretno "abformen mit Silikon".
Za barvanje surovega laminata definitivno rabiš plastik primer, če ne površinska napetost material naredi svoje, ne pozabi da imaš gor ostanke ločilnega voska pa če tudi še tako pucaš.
Les in gips sta v ta namen preveč porozna - z lesom še gre, samo ga moraš prej lepo sfiniširat in dat gor ali poliester kit ali pa še bolje barvo.
Lep pozdrav, Sašo
-

frcac - Propeler fahrer
- Prispevkov: 1570
- Pridružen: Sr Jan 25, 2006 9:08 pm
- Kraj: Godovič
- Avto: BMW pa še en BMW
Re: home-made trobentice- velocity stacks
![]() Napisal/-a Vičo dne Ne Jun 06, 2010 11:28 pm
Napisal/-a Vičo dne Ne Jun 06, 2010 11:28 pm
Slučajno najdu en DIY na clubgti forumu - to si vidu?
Se mi zdi, da je tipu kar dobro ratalo, ne? Karbon zgleda malo bolj fensi kot tista navadna poliester vlakna, drugače pa bi reku ista pašta.
Bi mogu dobit ločevalec, da gre kasneje narazen, nisem nikoli vprašal, s čim to namažejo.
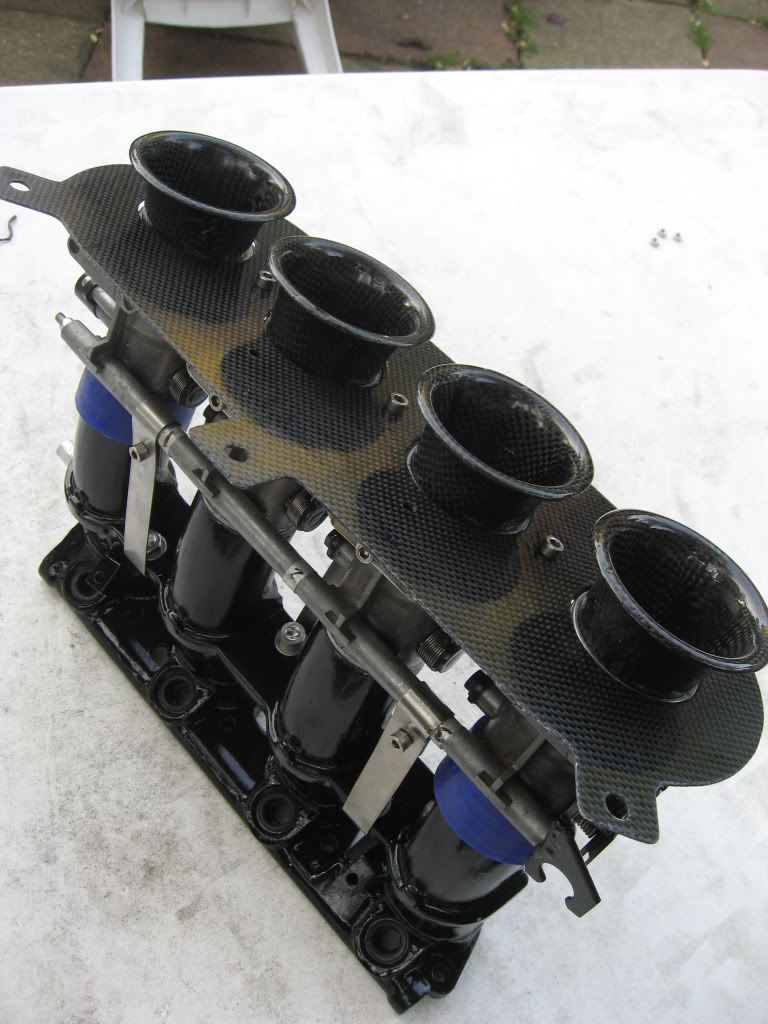
Had a couple of questions about how i have made some carbon fibre bits and bobs on my car so i thought i would put up a little guide with pics showing you the basics.
I have decided to use a carbon fibre trumpet to demonstrate, this is nice and small but shows how to create shape and moulds.
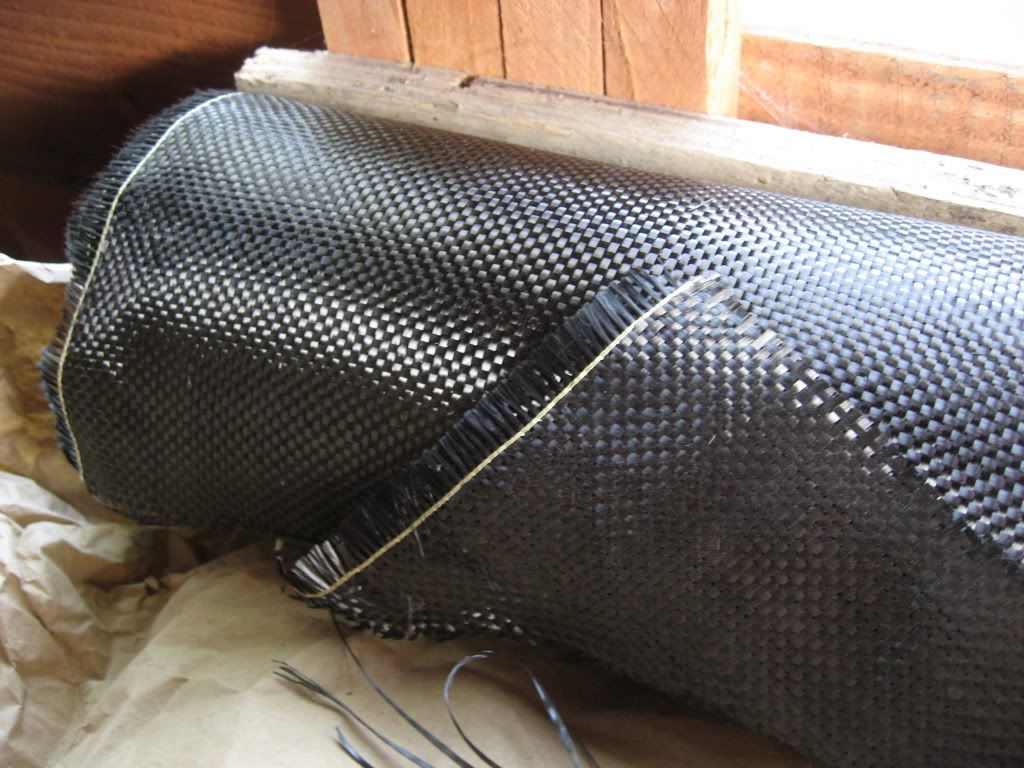
First of what is carbon fibre and why do i need it in my life?
Well, carbon fibre is a material consisting of extremely thin fibres, several thousand carbon fibres are twisted together to form a yarn, this yarn may be used by itself or woven into a fabric. Carbon fibre has many different weave patterns and can be combined with a plastic resin and wound or moulded to form composite materials such as carbon fibre reinforced plastic (also referenced as carbon fibre) to provide a high strength-to-weight ratio material.
The resulting material looks great, can be moulded to intricate and complicated shapes. Carbon fibre is good at not transferring (low temperature) heat so is handy to have as an airbox, radiator surround etc etc. It is also good to use on the interior as dash surrounds or dial holders, you could even make a bonnet and wings if you like.
To start with you will need…
Carbon weave
Sharp scissors
A old brush
Measuring cup
Mixing stick
Resin
Catalyst
Release agent
Lacquer
Sand paper
A File
A grinder or dermal tool
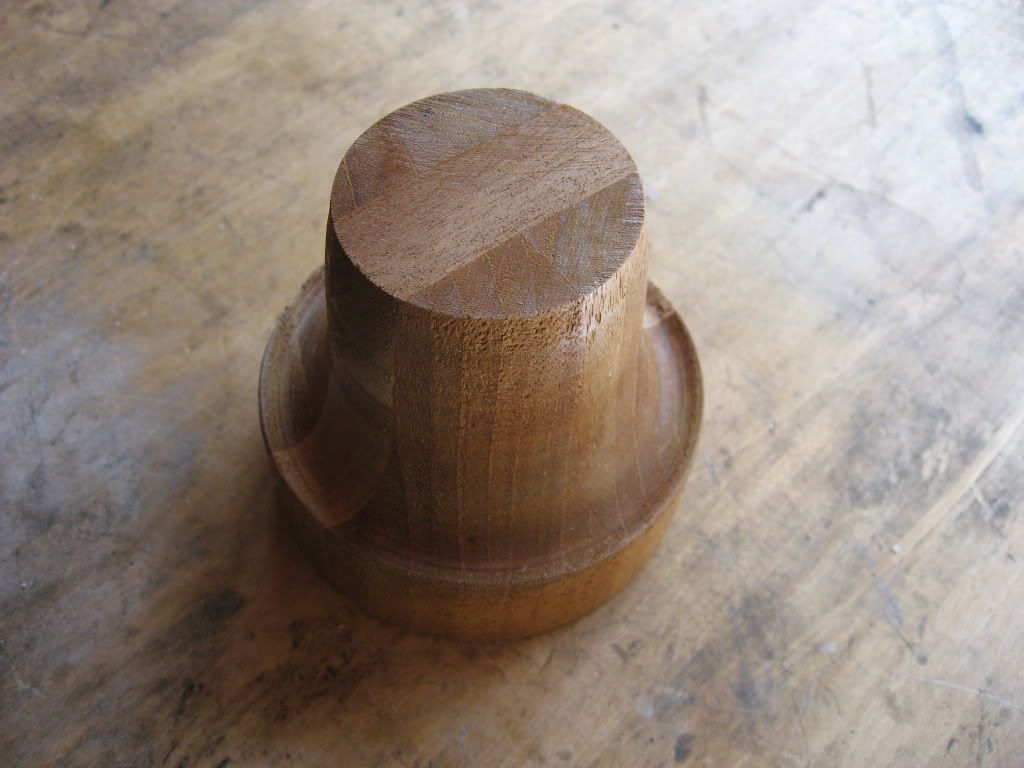
To start with you need to make a mould of what you want to make. Moulds can be made from many things such as plastercine, clay, wood, plastic etc I have decided to use wood as a mould material for this application because it is the best material to use to shape freely on a lathe.
I glued up the wood and took it to work shaping it very accurately on the wood lathe. With moulds it is best to shape them as accurately as possible because every little detail will be picked up in the finished piece.
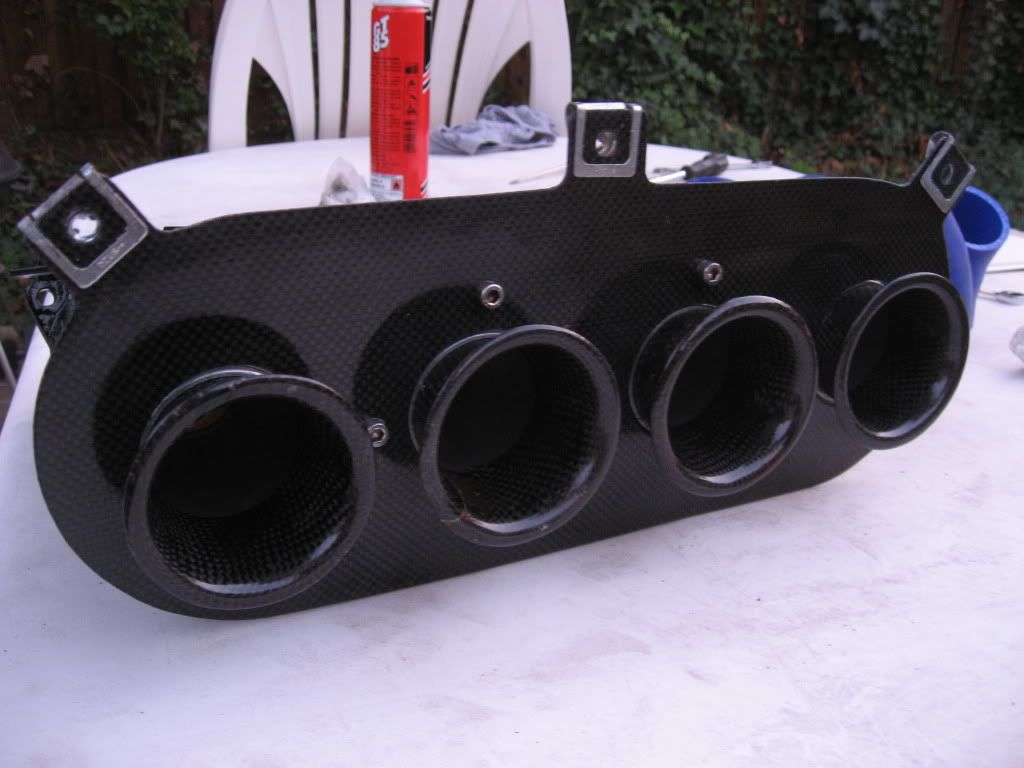
Also it is important to know which way to make the mould (convex or concave). The face of the carbon fibre that sits on the mould will have the smoothest and most aesthetically pleasing finish to it, for the trumpet I chose to make this the inside, because it is flowing air I wanted it to be as smooth as possible.
Wooden mould
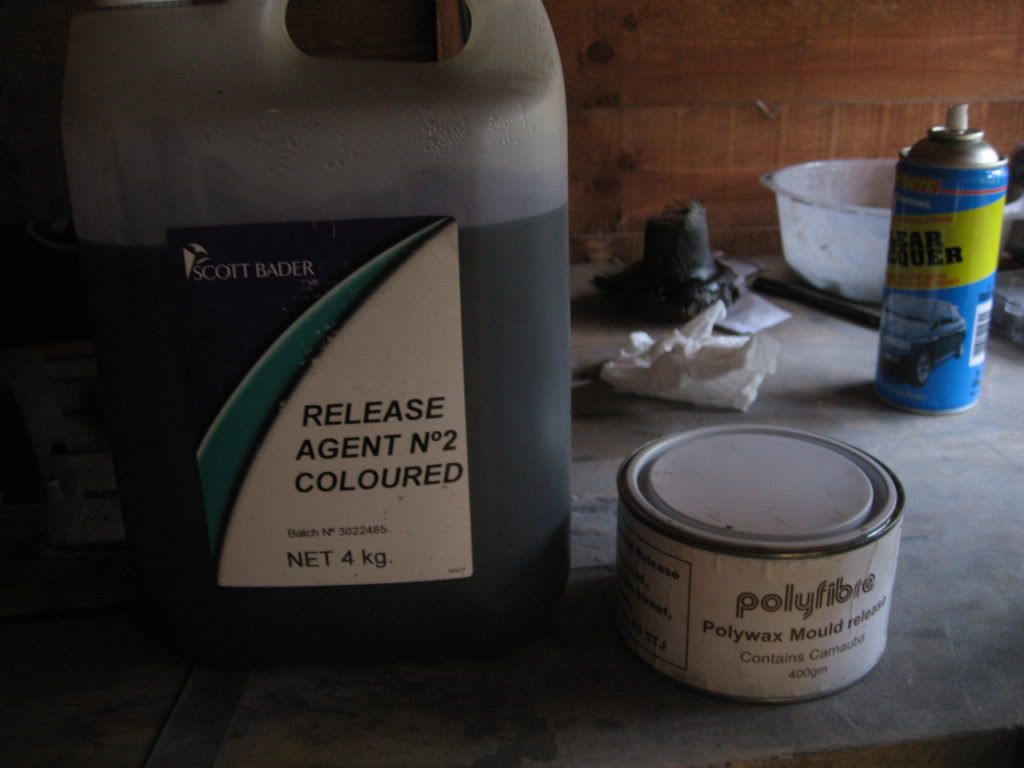
Once you are happy with the mould and are ready to lay up the material you need to first apply two or three layers of release agent. There are many different types of release agent such as wax, spray wax, blue (which is a type of PVA) etc. you need to decide which will be best for your application. Here I used wax applied with a cloth.
Release agents
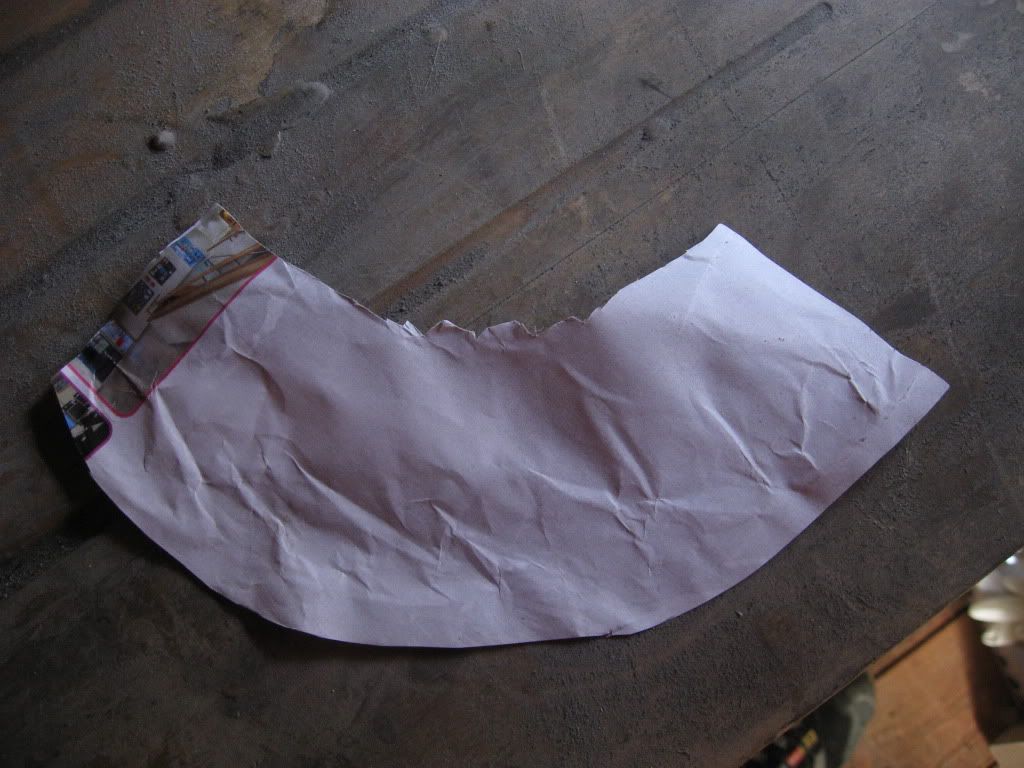
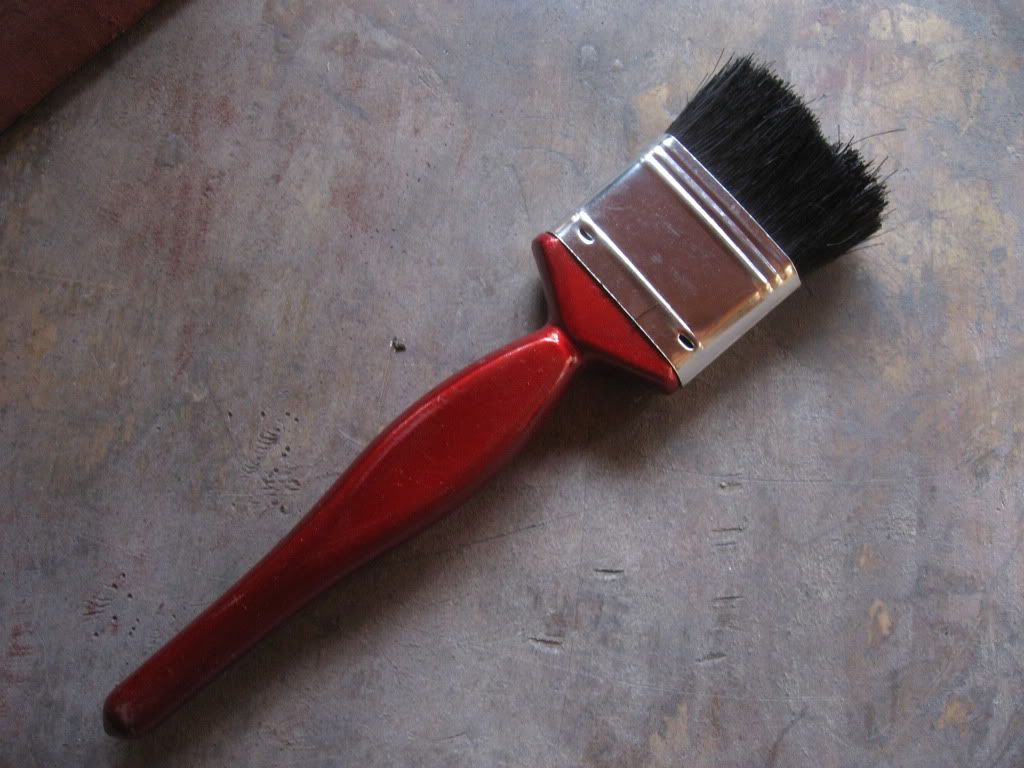
Before you start cutting your carbon weave up it is best to make a paper template of the shape and amount of carbon required. (a 1m sheet of carbon costs over £25). And cut your brush down so that it is easy to stipple with. (I use the cheapest brush I can find and then just chuck it away after one use).
Paper template
Cut down brush
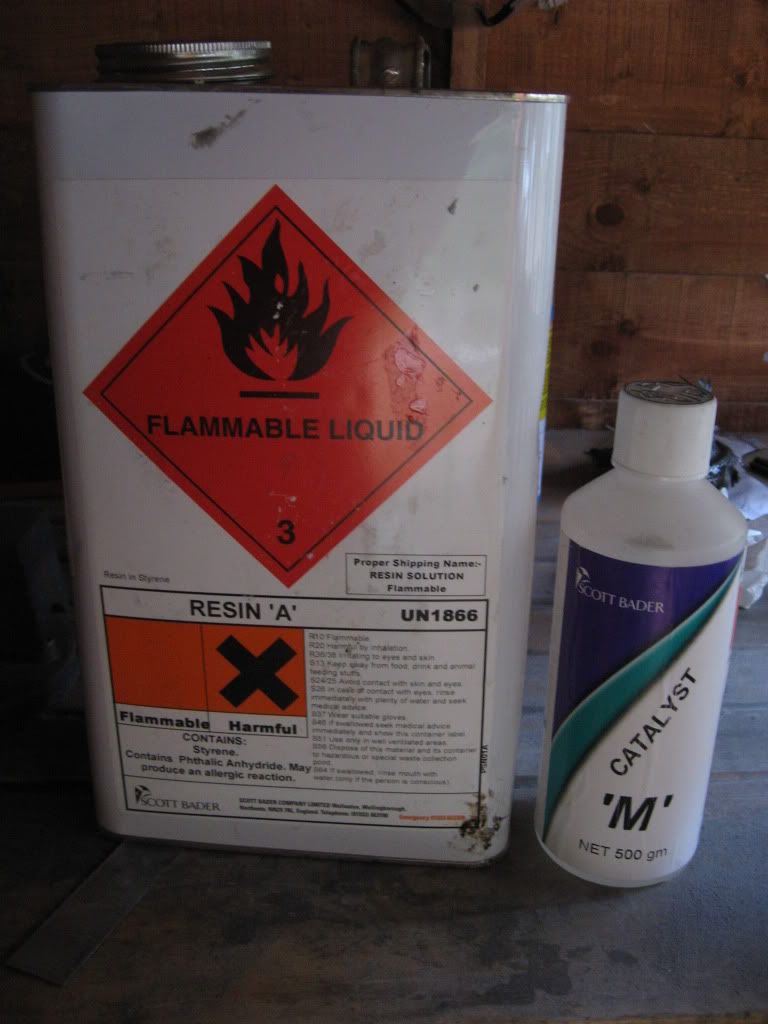
Cut the carbon to the shape of the template using a sharp pair of scissors and put to one side. You now need to mix up your resin and catalyst. I only needed around 50ml so I only mix up that. Once mixed, the resin will set in about 5mins less on a warm day.
Resin and catalyst
Lay the carbon weave around the mould and pull it to the right shape, the weave will move and shape quite easily. Load the brush with resin and coat the piece of carbon, stipple the carbon by quickly and lightly dabbing the end of the brush all over the weave. Be gentle, once the carbon is pregnated with resin lightly stipple it into the mould ensuring that there are no air bubbles. Once done put on the second layer of carbon (I used two layers and the trumpets are quite stiff) and repeat the whole presses. Leave to cure for 1 hour or move before removing from the mould.
Carbon layered on the mould
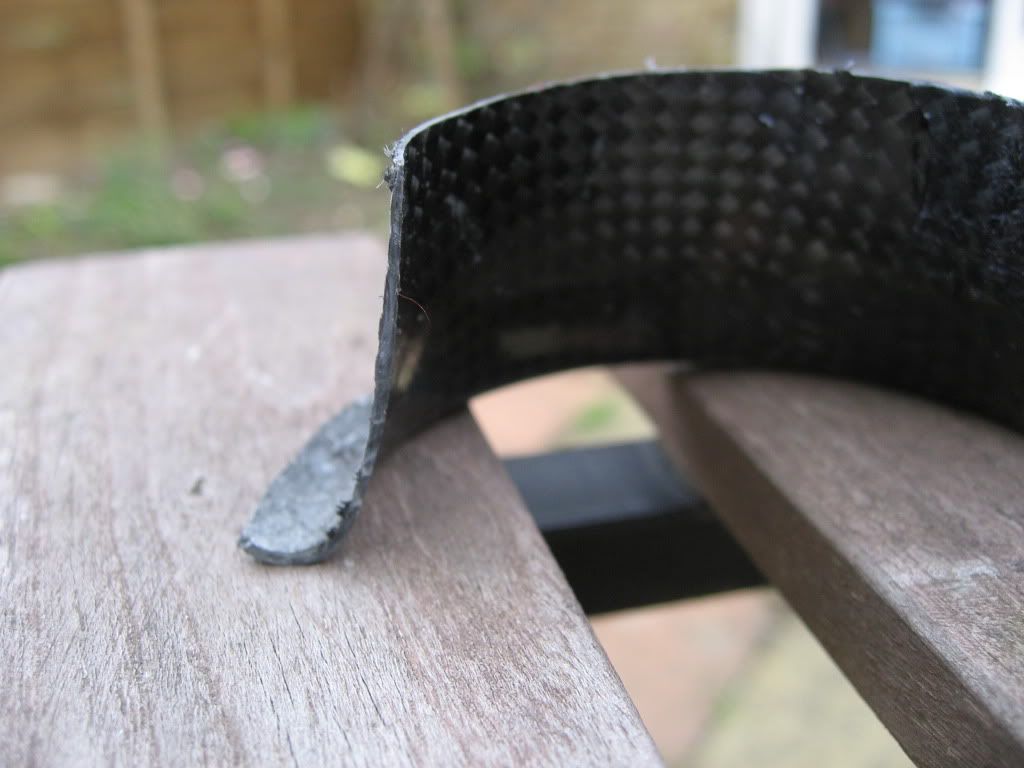
This shows the thickness of two layers of carbon, when shaped like this it is quite strong and ridged, if it was flat then two layers will flex quite a bit.
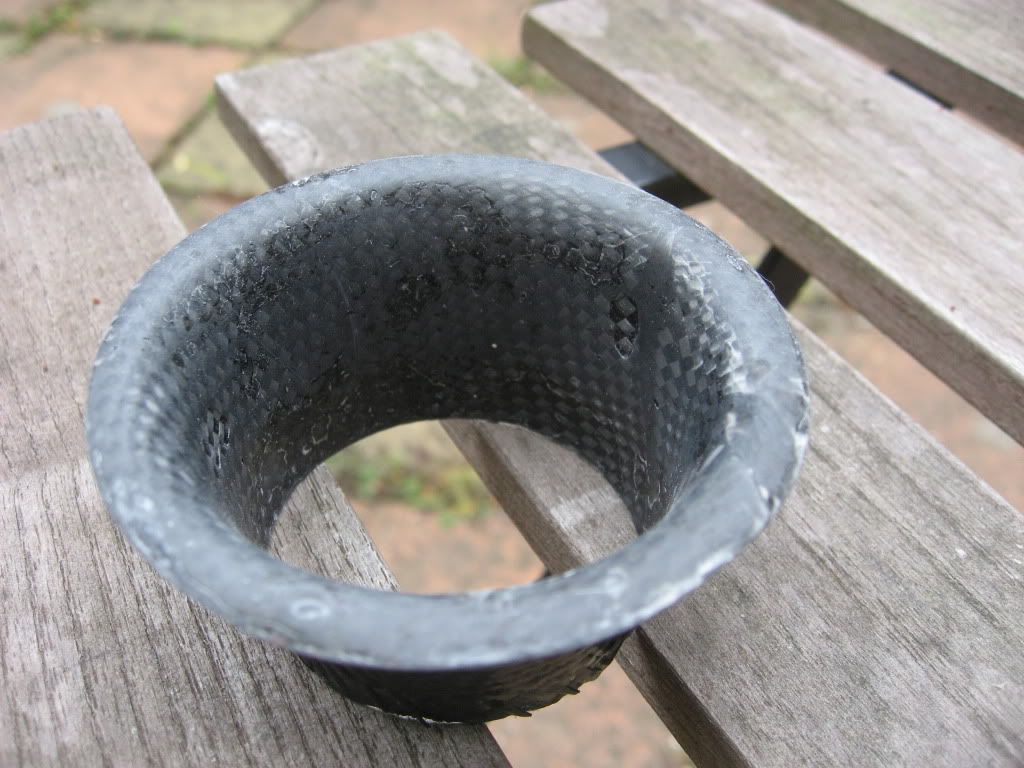
Cut away trumpet
After a good few hours or better over night, remove the carbon trumpet from the mould by first breaking the bond. Work around the edges of the mould flexing the carbon all the way round. Then grip the mould well and give it a good tug – it should pull off nice and easily – if not then use more release agent next time.
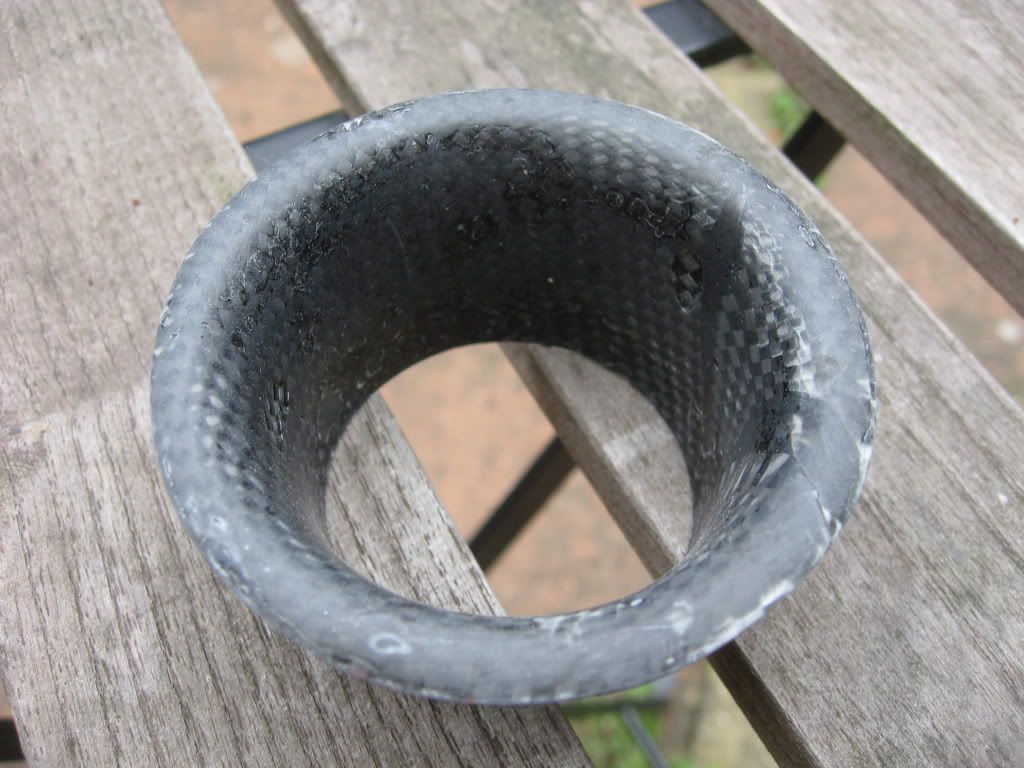
Using a dremal or angle grinder trim of the excess material until you have the correct shape. Use a file to neaten up the edges of the piece. With wet and dry paper 600grit sand the inside of the mould removing any small imperfections.
Sanded carbon after release from mould
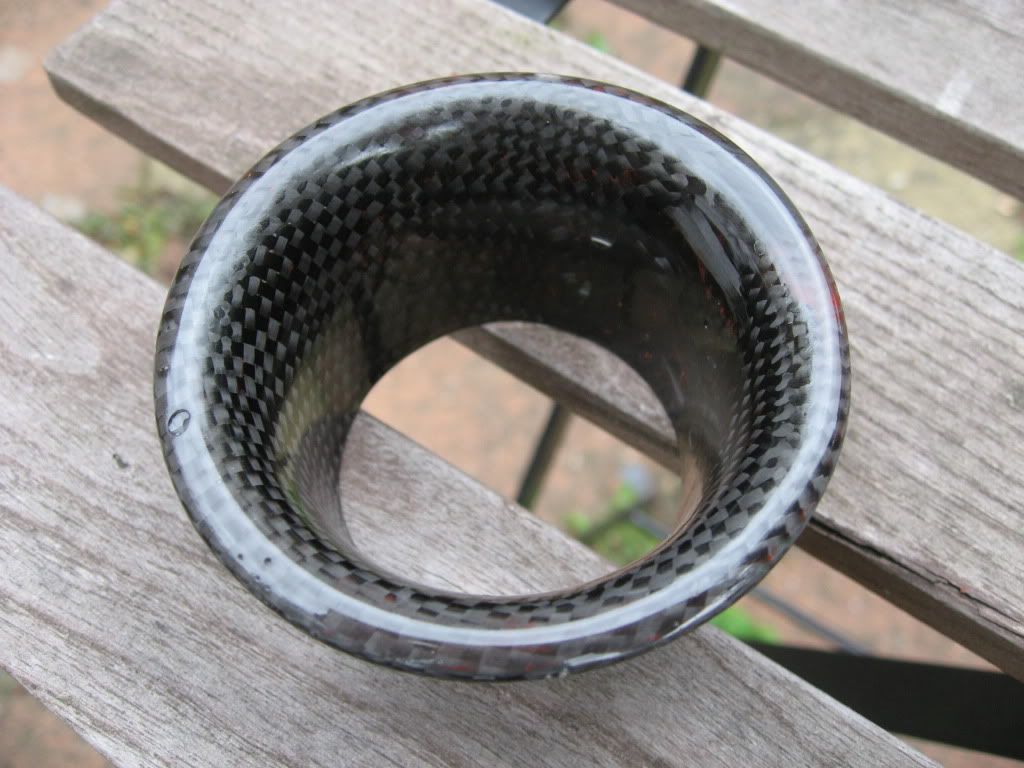
Wash and then dry the carbon off, leave to dry out fully before applying the lacquer. I used just standard automotive bodywork lacquer as it has a great finish and UV stabilizers so it does not turn yellow.
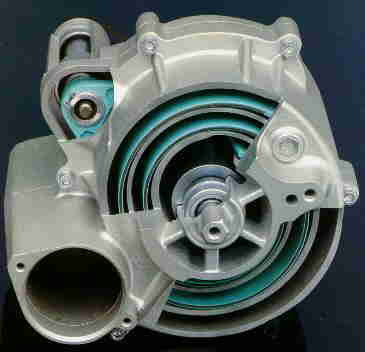
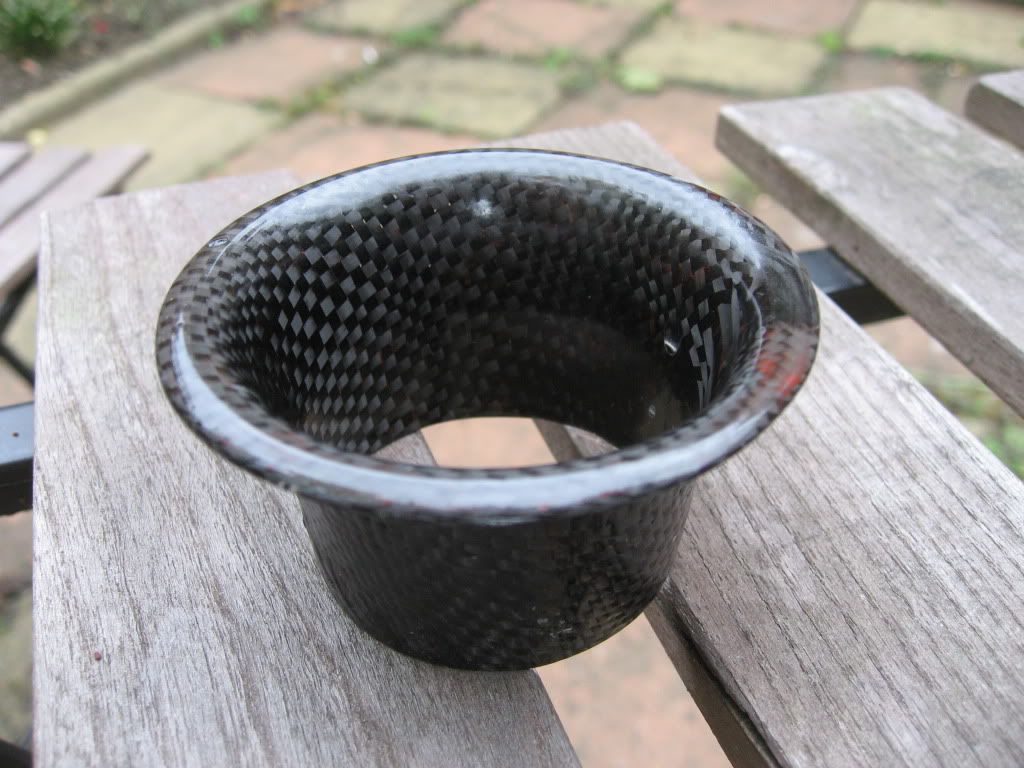
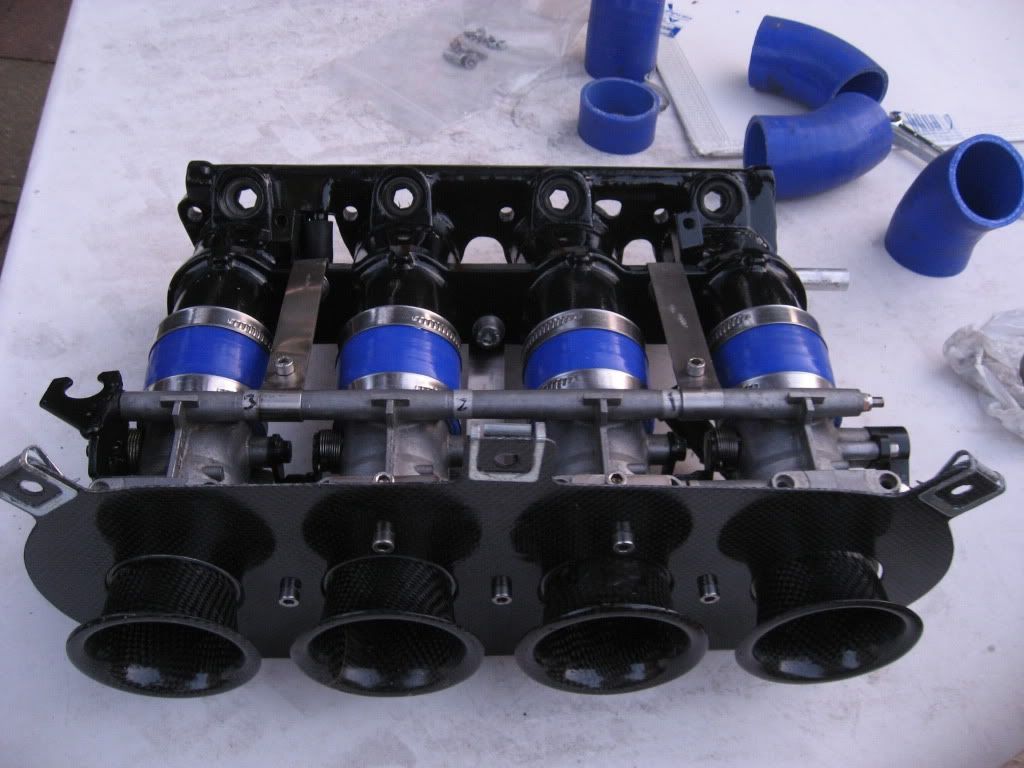
Finished carbon trumpet
As you may have noticed I have been using just your standard resin for fibre glassing, it works perfectly and is cheap. You can use epoxy resin with carbon it creates a much stronger piece of material but it does cost more and when making none structural parts adds very little to a piece such as these trumpets.
These techniques are the same as GRP, glass reinforced plastic is another great way of creating parts for your cars, GRP is a lot cheaper to but still can be bought in weaved mat just like the carbon. Add a colour dye to the resin or paint it and it is just as good but not as attractive.
Once you get good at laying up you can start making what ever you want…

Se mi zdi, da je tipu kar dobro ratalo, ne? Karbon zgleda malo bolj fensi kot tista navadna poliester vlakna, drugače pa bi reku ista pašta.
Bi mogu dobit ločevalec, da gre kasneje narazen, nisem nikoli vprašal, s čim to namažejo.
Ladeluftgekühlt
-

Vičo - Stalni uporabnik
- Prispevkov: 3327
- Pridružen: Pe Jan 27, 2006 12:28 am
- Kraj: Bistrc
- Avto: '90 GTi G60
Re: home-made trobentice- velocity stacks
![]() Napisal/-a Vičo dne Ne Jun 06, 2010 11:40 pm
Napisal/-a Vičo dne Ne Jun 06, 2010 11:40 pm
Ladeluftgekühlt
-
Vičo - Stalni uporabnik
- Prispevkov: 3327
- Pridružen: Pe Jan 27, 2006 12:28 am
- Kraj: Bistrc
- Avto: '90 GTi G60
Re: home-made trobentice- velocity stacks
![]() Napisal/-a eugene dne Po Jun 07, 2010 8:22 am
Napisal/-a eugene dne Po Jun 07, 2010 8:22 am
Zlo lepo.Nisem še vidu. Dober info vičo.
"Try not. Do. Or do not. There is no try." - Master Yoda
-
eugene - Valček s.p.
- Prispevkov: 3819
- Pridružen: To Avg 08, 2006 2:21 pm
- Kraj: Vukojebina
- Avto: Mk1 gti, hrošč '67, volvo 145 in 245 superpolar
Re: home-made trobentice- velocity stacks
![]() Napisal/-a traceour dne Ne Jun 13, 2010 5:00 pm
Napisal/-a traceour dne Ne Jun 13, 2010 5:00 pm
lahko se pa pr men oglasis, bova spedenala use tole, ker delam u firmi k se velik oz samo z takimi stvarmi ukvarjamo... mam pa usega dovolj, smole, vlaken, kiti, šprickiti, papirji, lak, use skratka... če te zanima sm ti prpravlen pomagata tale kalup spedenat tako kot se zagre....
Nš ni biu, če pa že, pa ni nč kriv
-

traceour - Stalni uporabnik
- Prispevkov: 606
- Pridružen: Po Mar 29, 2010 10:40 pm
- Kraj: tržič
- Avto: Carisma
37 prispevkov
• Stran 2 od 2 • 1, 2
Kdo je na strani
Po forumu brska: 0 registriranih uporabnikov in 6 gostov